

Appearance
Support people at your site with an iPad kiosk #
A delivery driver arrives while your team is elsewhere. A customer finds a broken pump. A contractor needs the site's instructions before starting work. Put a dedicated iPad kiosk at the site so each person has a clear next step and your team can see what was recorded.
Dataplicity Visitors is an iPad-only kiosk app. People use the shared iPad at your premises; staff configure the site and review its records in the Dataplicity web app. You choose which actions the kiosk offers: Check in, Delivery, Report a fault, and customer support calling when enabled and available.
Start with one location and the job you need it to do. A staffed reception might need sign-in and inductions. An unattended forecourt can offer deliveries, fault reporting and help without offering visitor check-in.
For a complete business example, follow Support an unattended fuel forecourt. It follows a driver, a customer and the remote operator through the same fictional site.
The screenshots below use fictional Riverside example details. Your screens follow the questions and instructions configured for your site.
Set up the first site #
Use an account authorised to configure Visitors. Open Visitors → Settings → Sites, create or select the location, enable Visitors and confirm its time zone. Give it the name people recognise on the ground.
Write a welcome message that tells people what to do. Configure the collection notice, contact details and retention periods for the information you need. Staff permissions determine which settings and records they can access.
Under Settings → Visit types, create the journeys you need and select each type's Welcome screen action. For example:
| What happens at your site | Example type | Welcome screen action |
|---|---|---|
| A guest meets a colleague | Guest | Check in |
| A supplier records a drop-off | Supplier delivery | Delivery |
| A customer reports broken equipment | Equipment fault | Report a fault |
Enable those types on the site. To offer only deliveries and faults, disable all types with the Check in action. Check out appears only when check-in is offered.
Customise the effective flow for each type. A contractor may need an induction and a named host; a fault report may need an equipment identifier and a description. Use Preview effective flow to inspect the resulting questions before handing the kiosk to the public.
Pair the Visitors app #
- On the dedicated iPad, download Dataplicity Visitors from the App Store and open it.
- In the web app, open Visitors → Settings → Kiosks → Pair kiosk.
- Enter the current six-character pairing code displayed on the iPad and select the intended site.
- Confirm the organisation and site on the iPad. Give the kiosk a recognisable name, such as Northgate entrance.
- Select Public Kiosk for a shared self-service installation. Reception is available for staff-assisted visits.
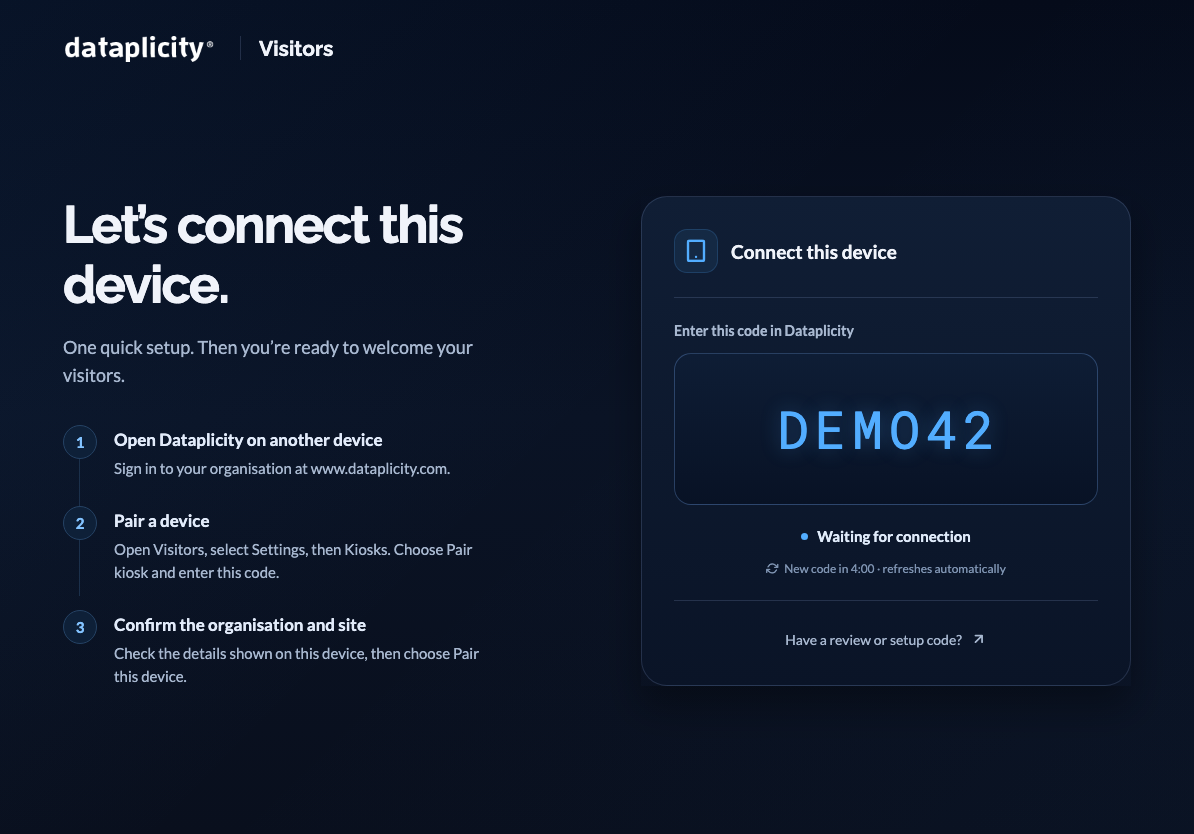
The paired iPad uses its own restricted kiosk credential. Staff administer records through their own web accounts.
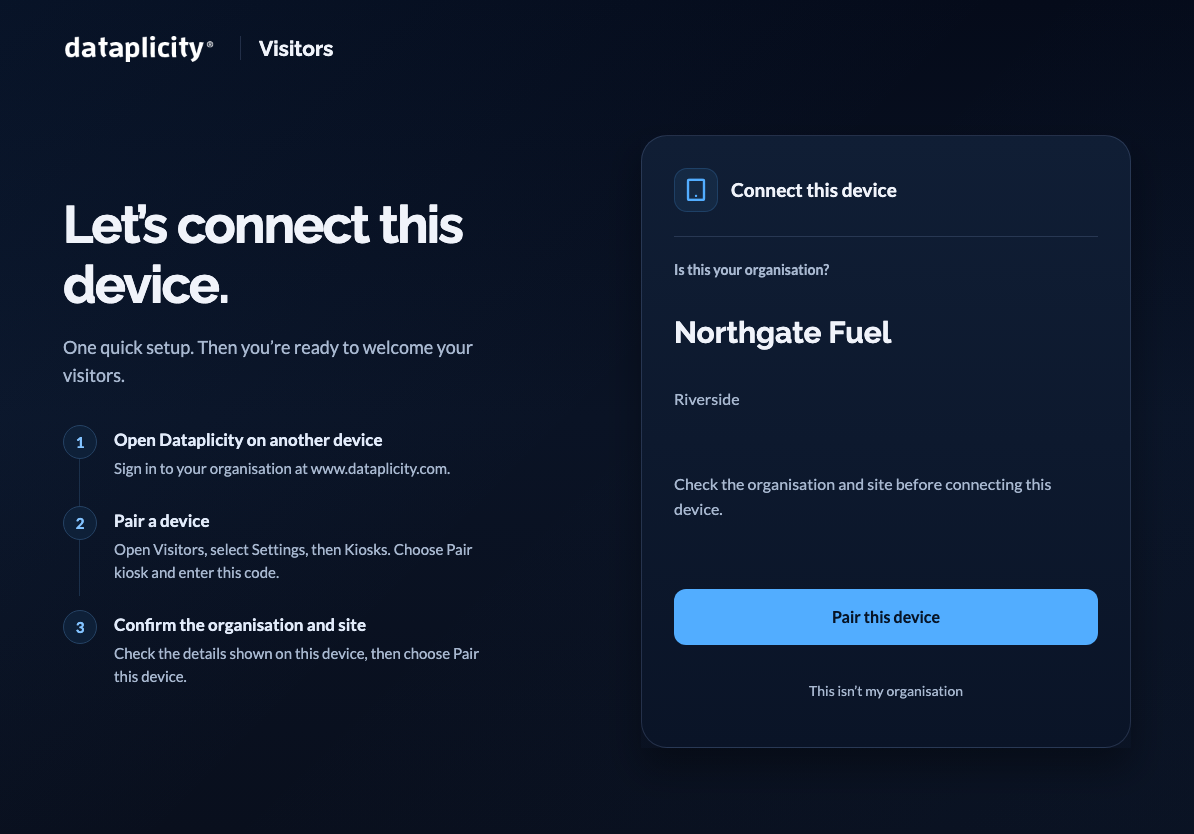
Place the iPad where people can find and use it, provide reliable power and connectivity, and secure it for public use. Use your organisation's iPad management or Guided Access policy to keep it in the kiosk app. Choose a mounting location approved for your premises and test the camera, microphone and speaker from that location.
Record a delivery while your team is elsewhere #
A driver selects Delivery, scans a compatible delivery QR code with the iPad camera, reviews the displayed fields and confirms. The delivery is saved against the kiosk's assigned site. The driver does not need a staff account.
Arrange a compatible QR with the supplier before rollout. It contains a flat JSON object with named delivery fields, such as waybill, supplier and load reference. An ordinary tracking website QR will not work. Keep identifiers with leading zeroes as text.
In Visitors → Settings → Deliveries, select the delivery types and configure any shared delivery questions used by form-based arrivals. You can also explicitly enable Send delivery arrivals to a messaging channel, then add the colleagues who should receive those summaries. A driver submission does not create or select a channel.
Staff open Visitors → Deliveries to find the reference, review the captured details, filter by site or date and export the permitted records. A recorded delivery establishes what was submitted at the kiosk; your receiving procedure establishes whether the goods or fuel were accepted.
The forecourt walkthrough includes a concrete QR example and the operator's review.
Give a fault report enough detail to act on #
Create a type with Welcome screen action → Report a fault and enable it at the site. Customise its questions around the decision your team needs to make: which asset, where it is, what happened and whether the reporter wants a reply. A required choice of pump or facility avoids a report that only says “it's broken”.
The person selects Report a fault, completes the configured flow and submits. Staff review the submitted record and answers in Visitors, using the type and site to identify the report. Faults use the existing Visitors record flow; assign repair ownership and track completion through your team's maintenance process.
The forecourt example shows separate questions for pumps, facilities and bins.
Let someone at the kiosk reach customer support #
In the site's settings, enable customer support calls and write the message shown when support is unavailable. Include the hours and alternative contact method your team actually provides.
A colleague opens Customer Support in the web workspace, goes on call until a chosen time and enables incoming-call audio. Keep that browser open and connected. The iPad shows current availability.
At the kiosk, the caller opens Need help? → Video call support. The support operator receives the site and kiosk context. When they answer, the iPad connects its microphone and camera automatically. If the operator answers with audio only, the caller hears them without a support video picture. There are no microphone or camera buttons for the caller to operate. Set up the app's camera and microphone permissions on the mounted iPad before opening the kiosk to customers. The caller needs no Dataplicity customer account.
Messages becomes available after support answers. If the media connection drops, messages remain available while the iPad tries to reconnect to the same call. Choosing End call closes the conversation. When customer support ends it, the kiosk closes it automatically, including during reconnection.
When nobody is available, the kiosk shows your fallback message. If a request remains unanswered, it returns an unavailable response rather than providing an attended conversation. Test both an answered call and the unavailable path before offering this service at the site.
Prepare and publish an induction #
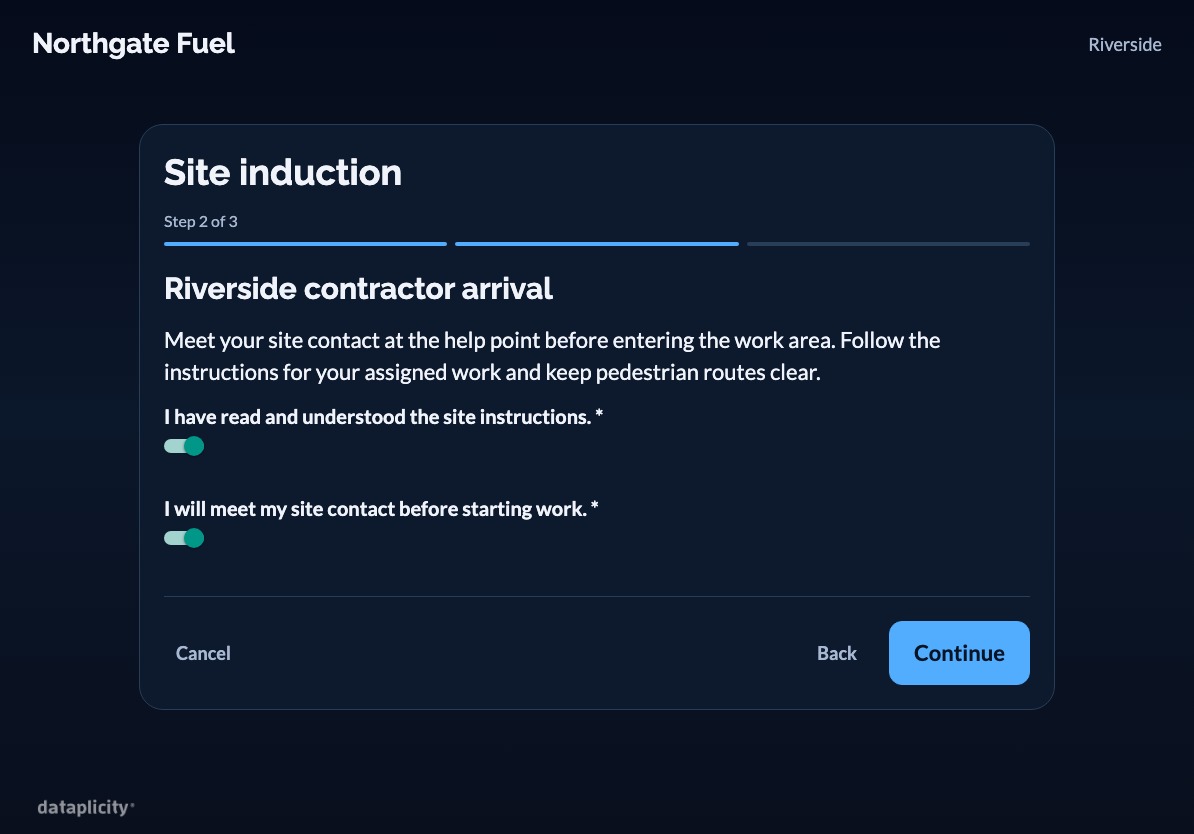
For people entering the site to work, create an induction under Settings → Inductions. Add the instructions, media, required acknowledgements and any scored questions. Give videos captions or a text alternative and images alternative text.
Preview it, then Publish new version and assign it to the relevant site and visit types. Earlier completion records retain their original version. A returning visitor must satisfy the version required for that visit; a session already in progress keeps its recorded version.
Handle arrivals and departures #
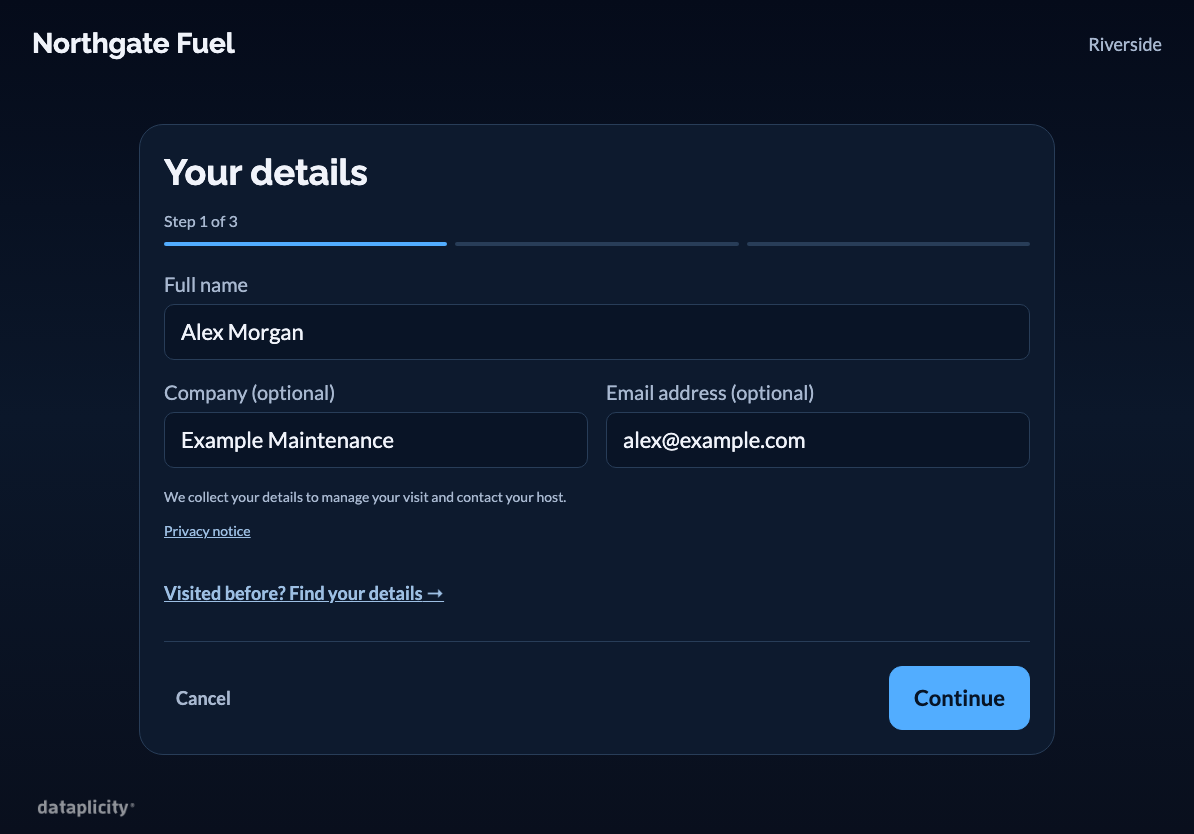
For a check-in journey, the visitor enters the configured details, selects a host where required and completes any photo and induction steps. Add eligible colleagues under Hosts and recipients and configure arrival notifications when needed.
Staff use Overview for submitted arrivals and records needing attention, History for earlier visits, People for retained profiles and induction history, and My arrivals for visits assigned to them. Host notifications use the main Dataplicity staff app; visitors continue to use the shared iPad kiosk.
Authorised reception staff can Add visitor. If induction evidence is incomplete, record the actual arrival with a reason and direct the visitor to finish the induction on an enrolled kiosk. Recording an arrival does not create a passing induction.
Record the departure when the person leaves. If the departure time is unknown, record it as unknown. Use physical site checks and your emergency procedure to establish who is actually present.
Correct and review records #
Open a record to inspect the submitted answers and history. Authorised staff can correct facts, void duplicates or reopen visits with a reason. Export CSV requires export permission for the relevant site. Site grants control which records staff can see.
Work through a connection interruption #
Check Settings → Kiosks for connection state, last sync and pending submissions. An iPad may hold work that has not reached the web register yet. Reconnect the original device and confirm pending submissions have synchronised before relying on the central record. Live support calls need an internet connection.
Recover pending submissions before re-enrolling or replacing a kiosk. Retention settings also affect how long photos and induction evidence remain available.