

Appearance
Build a camera and CCTV product #
By the end of this workshop, a customer named Acme Farm can sign in to your portal, open North Yard Camera, watch live video, and scrub the recording timeline. You do that without opening inbound ports or building your own video cloud.
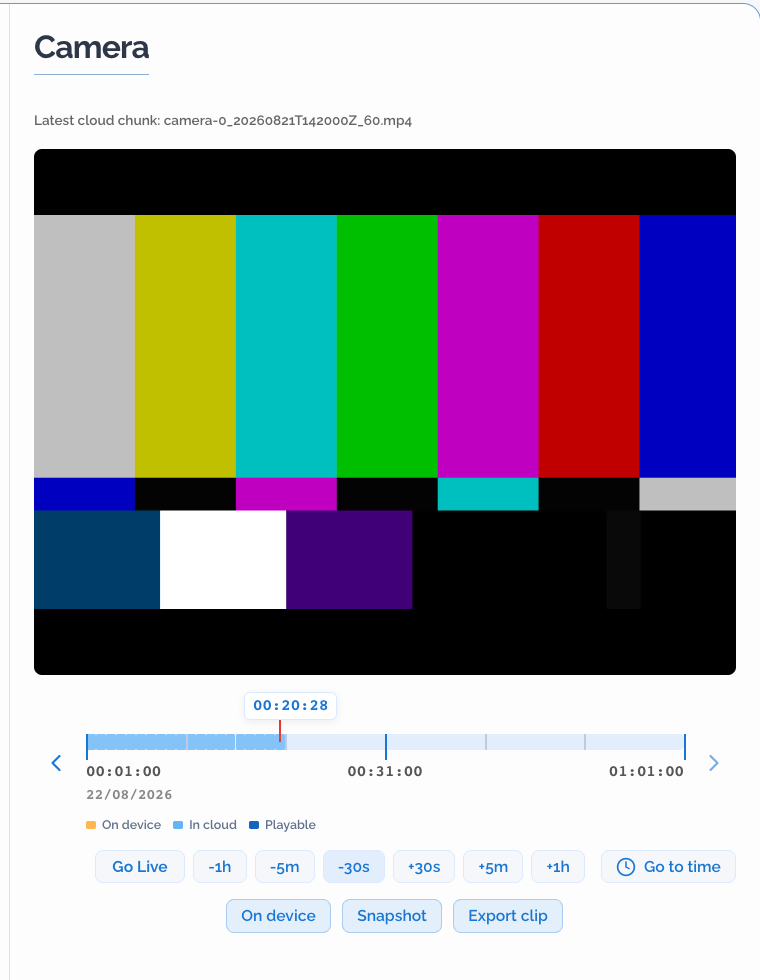
How to use this page #
Do Path A first. It uses a colour-bar test pattern, so you do not need a camera. When Path A works, optionally continue to Path B (real camera) or Path C (two-camera entrance inspection Product Application).
| Path | What you prove | Camera needed? |
|---|---|---|
| A. Sellable CCTV loop (required) | Device Class, Software, install, customer, live view, recordings | No |
| B. Real camera (optional) | Same loop with a CSI or USB sensor | Yes |
| C. Entrance inspection app (optional) | Product Application that captures entry then lobby snapshots | Prefer two cameras |
Names used everywhere in this guide (copy them exactly so screenshots and steps match):
| Thing | Exact name |
|---|---|
| Device Class | SiloSentry Camera |
| Camera Software example | Video generator (sim) (video-gen-sim) |
| Physical / provisioned device | North Yard Camera |
| Customer organisation | Acme Farm |
| Customer network (site) | Site Entrance |
| Example product brand | SiloSentry |
Your organisation gets its own hosted portal domain such as your-vendor.dvcmgr.com. Always use your domain from Customer journey > Customer Portal, not example hostnames from screenshots.
Dataplicity owns the outbound connection, video delivery, product definition, and customer portal. You still own camera hardware, privacy design, retention, installation, pricing, and support.
Unfamiliar terms such as Device Class, Software, allocate, Network, or Enabled are defined in Platform nomenclature.
Path A: Sellable CCTV loop (do this first) #
What you need #
- A Linux computer that can reach the internet on HTTPS (Raspberry Pi 4 or 5 with Raspberry Pi OS 64-bit Bookworm is the documented bench; any supported Linux with Docker works for the test pattern)
- An official or reliable power supply and network connection
- A Dataplicity organisation where you can open:
- Engineering > Device classes
- a Device Class Software tab
- Engineering > Devices
- Customer journey > Customer Portal
- Customer journey > Customers
- A second email address you control for the customer Admin (must not be your vendor Dataplicity login email)
You do not need a camera for Path A.
Success rule
Do not move to the next step until the Done when checklist for the current step is true. A green fleet list is not enough. Path A finishes only when the customer can see live video and scrub recordings.
Step 1. Prepare the Linux host #
On Raspberry Pi OS, sign in and run:
bash
sudo apt update
sudo apt install -y docker.io ffmpeg
sudo systemctl enable --now docker
sudo docker versionDone when: sudo docker version prints a Client and Server section without errors.
On other Linux distributions, install a supported container runtime and FFmpeg with that distribution's packages, then confirm the runtime works the same way.
Recording disk (optional for Path A)
For a short demo, the Software can store clips on the root filesystem. For continuous recording later, mount durable media at /mnt/dataplicity-media before you rely on long retention, then confirm with findmnt /mnt/dataplicity-media and df -h /mnt/dataplicity-media.
Step 2. Create the Device Class #
- Sign in at dataplicity.com.
- Open Engineering > Device classes.
- Choose New device class.
- Name:
SiloSentry Camera. - Description:
Managed customer camera with live view and recorded timeline. - If architecture choices appear, select the one that matches the host (
linux/arm64for current Raspberry Pi OS 64-bit). - Create the class.
A Device Class is the reusable product definition. Every camera unit of this model is one instance of that class.
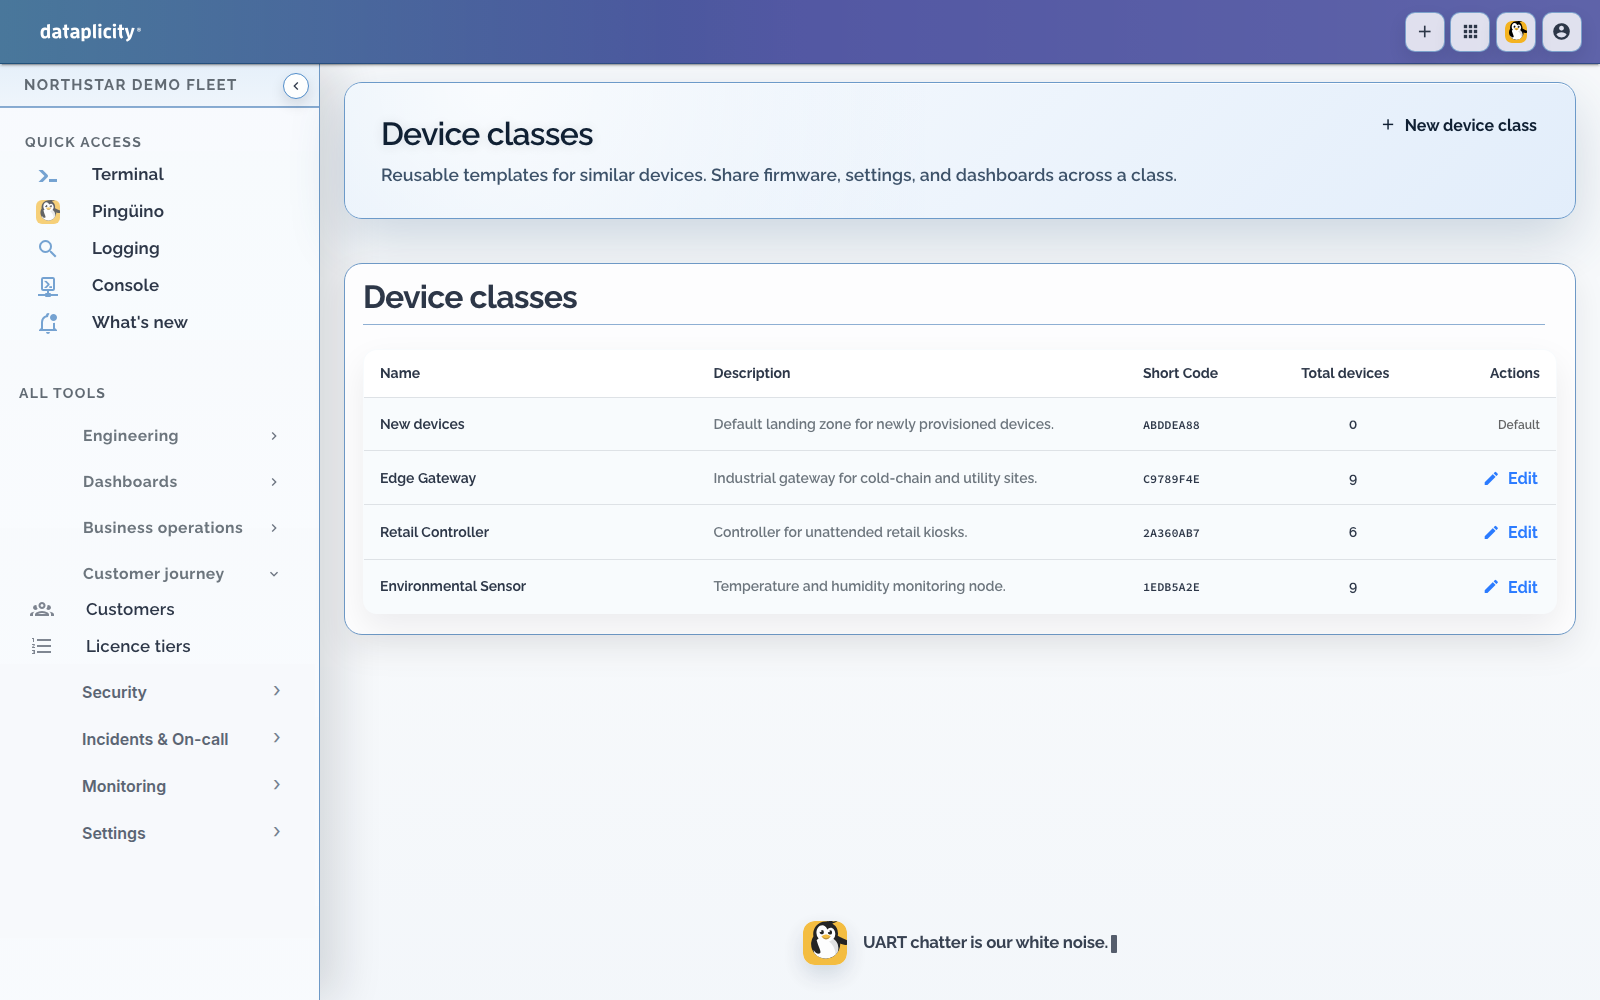
Done when: SiloSentry Camera appears in the Device classes list.
Step 3. Attach the camera Software #
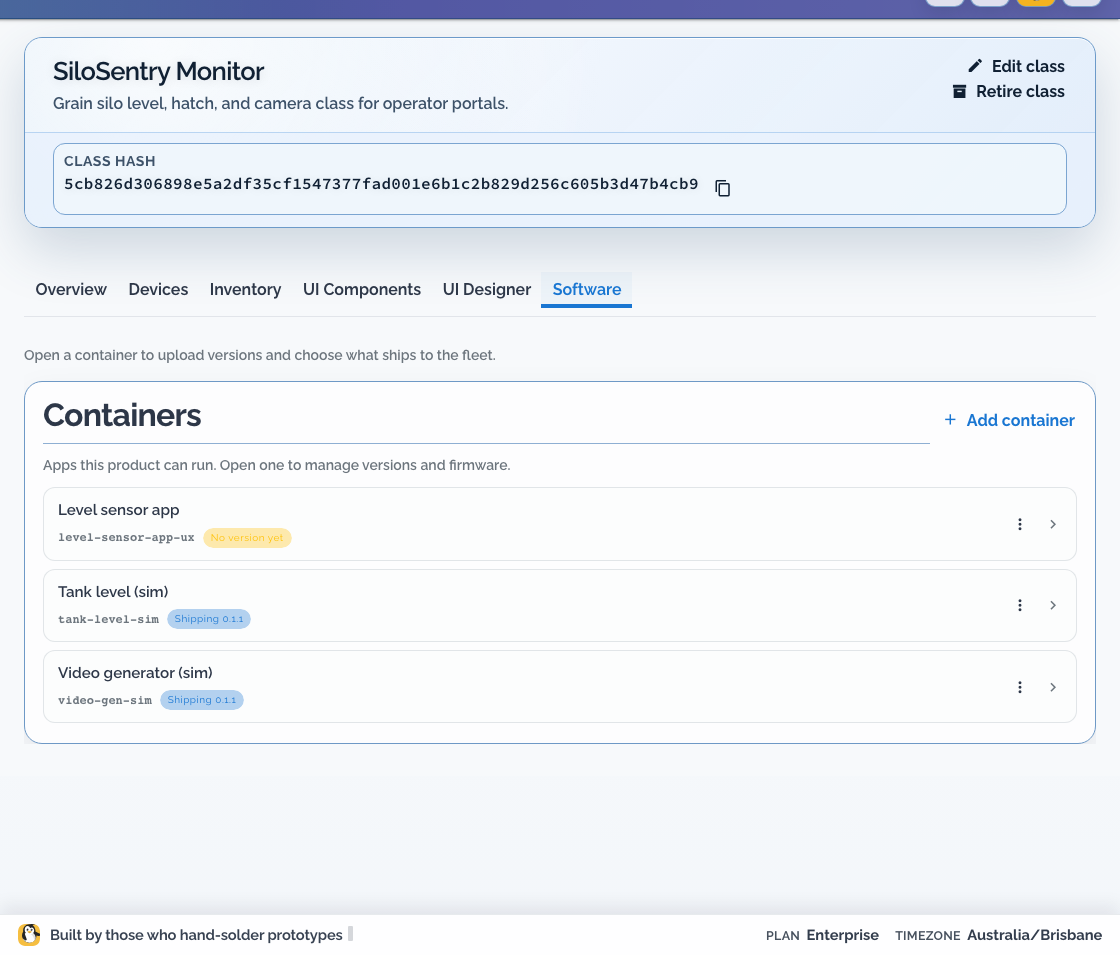
- Open SiloSentry Camera.
- Open the Software tab.
- Choose Add container.
- Keep Use an example selected.
- Select Video generator (sim) (
video-gen-sim). - Choose Add example.
Attaching this example adds:
- the
camera_videovideo stream and video widget - camera events
- Start recording, Stop recording, and Rotate video actions
- a Software set the class can ship to devices
If the UI says no release is available, stop. That is a publishing problem in the environment, not a Pi problem. See Example simulators.
When attach succeeds, Dataplicity often creates and ships the current Software set automatically. If it does not:
- Open Builds (or the Software sets list on the class).
- Create a build that pins the
video-gen-simversion you just attached. - Choose Make current for the class default (or pin to a staging tag if you use cohorts).
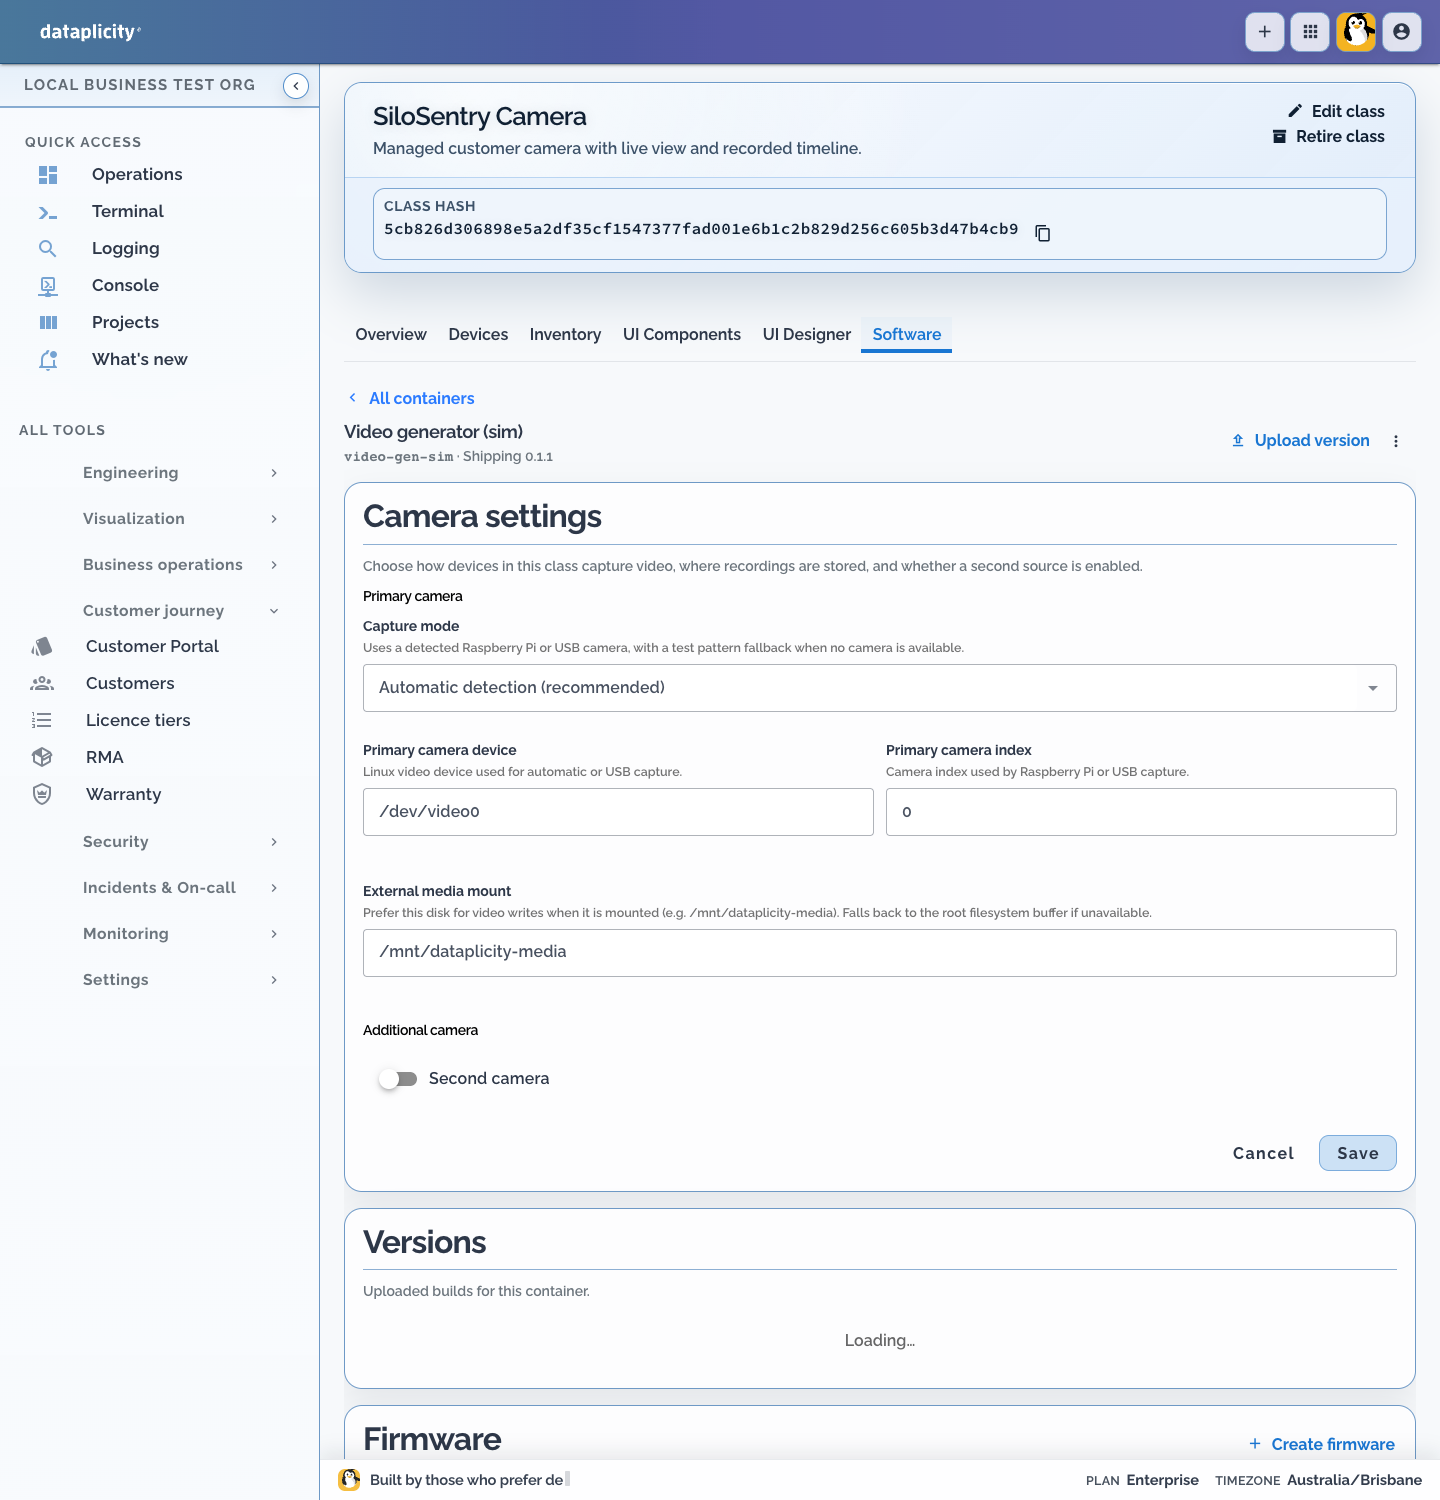
Camera settings for Path A #
Open the attached Video generator and set:
| Setting | Value for Path A |
|---|---|
| Capture mode | Test pattern |
| Second camera | Off |
| External media mount | leave /mnt/dataplicity-media (falls back to root storage if that mount is absent) |
Save the settings.
Why Test pattern, not Automatic detection
Automatic detection (recommended) tries a real camera first and falls back to colour bars if nothing is found. That fallback looks like success even when the sensor is missing. For Path A, choose Test pattern on purpose.
Done when:
video-gen-simis listed on the class Software tab- Capture mode is Test pattern
- Second camera is Off
- a current Software set includes that container version
Step 4. Install Dataplicity on the host #
- Open Engineering > Devices.
- Choose Add a new device or Add device.
- Select SiloSentry Camera.
- Copy the management-plane installer command (shape below). Do not use a classic Python installer.
bash
curl -fsSL https://install.dataplicity.com/install/REDACTED.sh | sudo bashTreat the installer command as a secret
The real command contains a private provisioning key. Do not paste it into tickets, screenshots, chat logs, source control, or documentation.
- Paste the command into the Linux host terminal and wait for it to finish.
- Stay on the Add device panel until Dataplicity reports that the device connected.
- Open the new device and rename it to
North Yard Camera.
Always provision into the vendor organisation first. Customer portal organisations cannot mint new devices. Ownership changes only through allocation later.
Done when all of these are true on North Yard Camera:
- status is Online
- inventory architecture matches the host (for example
arm64) - a container runtime is present
video-gen-simis Running- the
camera_videowidget appears - live view shows colour bars (SMPTE test pattern)

If the picture is sideways later with a real camera, use Rotate video. Rotation applies to live and recorded output.
Step 5. Confirm the Customer Portal #
- Open Customer journey > Customer Portal.
- Confirm:
- portal is enabled
- title is your product brand (for this walkthrough,
SiloSentry) - hosted domain is shown (example shape:
your-vendor.dvcmgr.com) - logo and sign-in copy are present
- Open that hosted login URL once in a private browser window and confirm the branded sign-in page loads.
If the portal does not exist yet, create it before inviting customers. Choose the subdomain carefully: it is permanent.
Done when: the branded portal sign-in page loads on your hosted domain.
Step 6. Create the first customer #
- Open Customer journey > Customers.
- Choose Add customer.
- Organization name:
Acme Farm. - Org admin email: an address the customer (or your test mailbox) controls.
- Select your Customer Portal.
- Create the customer.
The Org admin email cannot be the vendor operator's Dataplicity email. The customer receives an invitation or password-setup flow for your portal host.
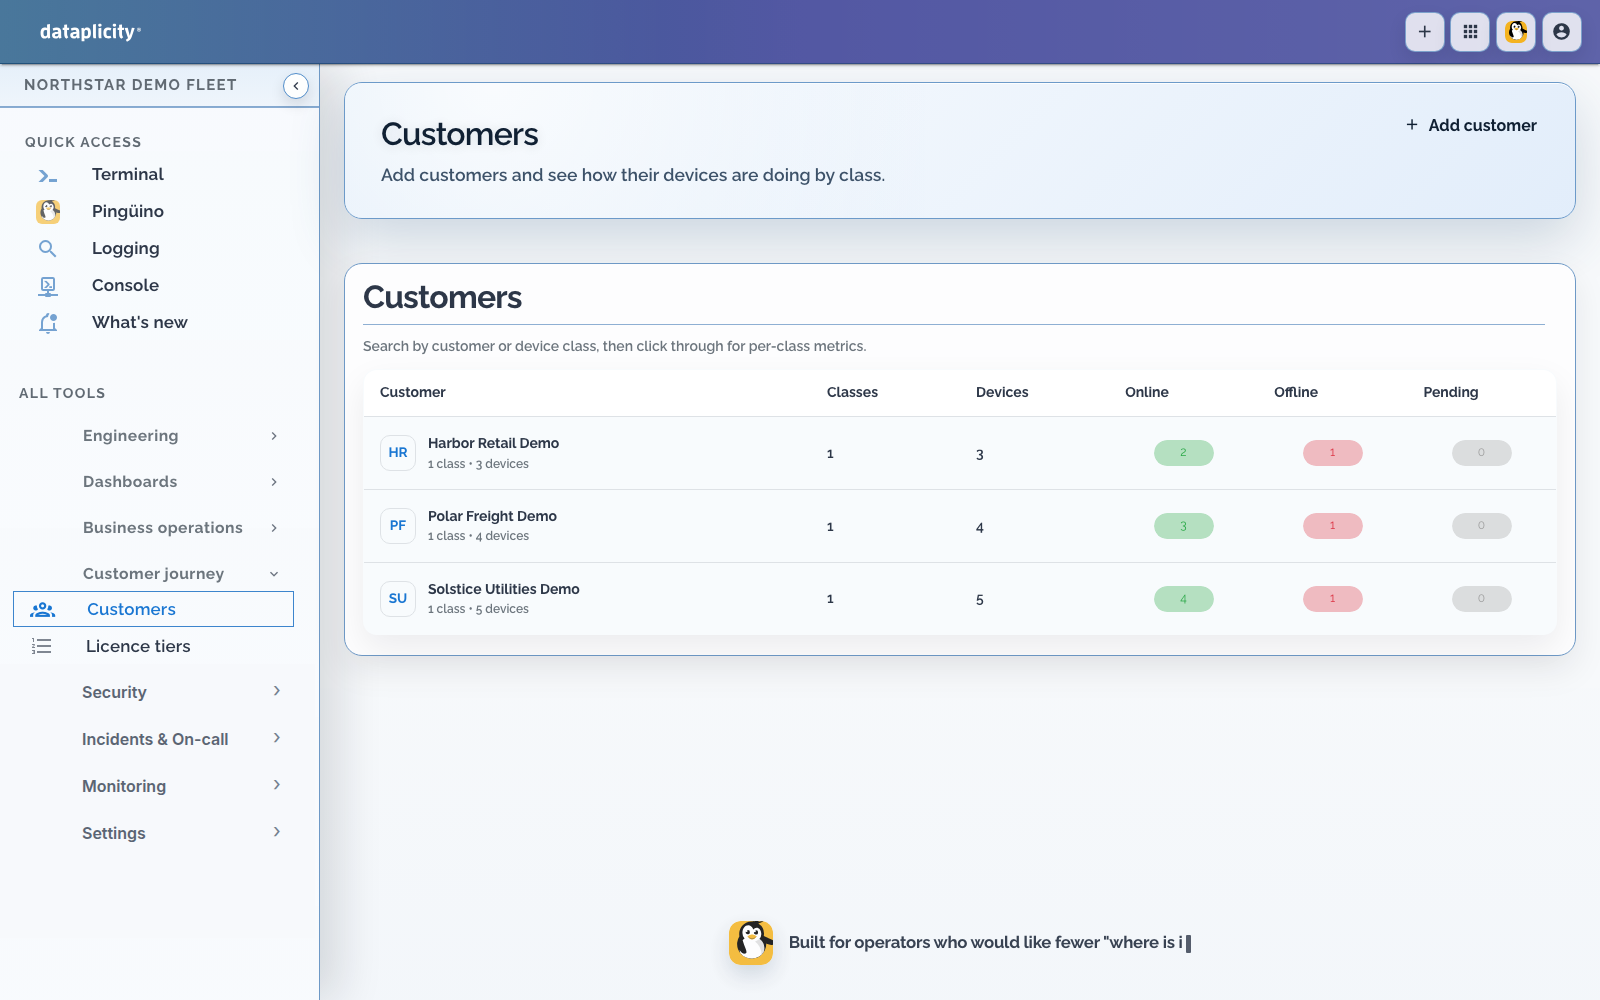
Done when: Acme Farm exists and the customer Admin invitation or password setup email is available.
Step 7. Create the customer site network #
Use a private browser window or a separate browser profile.
- Open
https://your-vendor.dvcmgr.com/login(use your real hosted domain). - Complete password setup from the invitation.
- Sign in as the Acme Farm Admin.
- Open Networks.
- Choose Add network.
- Name it
Site Entrance. - Create it.
A claimed online camera with no network is Ready. It becomes Enabled and app-active only after an Admin assigns it to a network.
Done when: Site Entrance appears under Networks.
Step 8. Allocate the camera to Acme Farm #
Return to the vendor workspace:
- Open Engineering > Devices.
- Find North Yard Camera.
- Choose Allocate to customer.
- Select Acme Farm.
- Confirm.
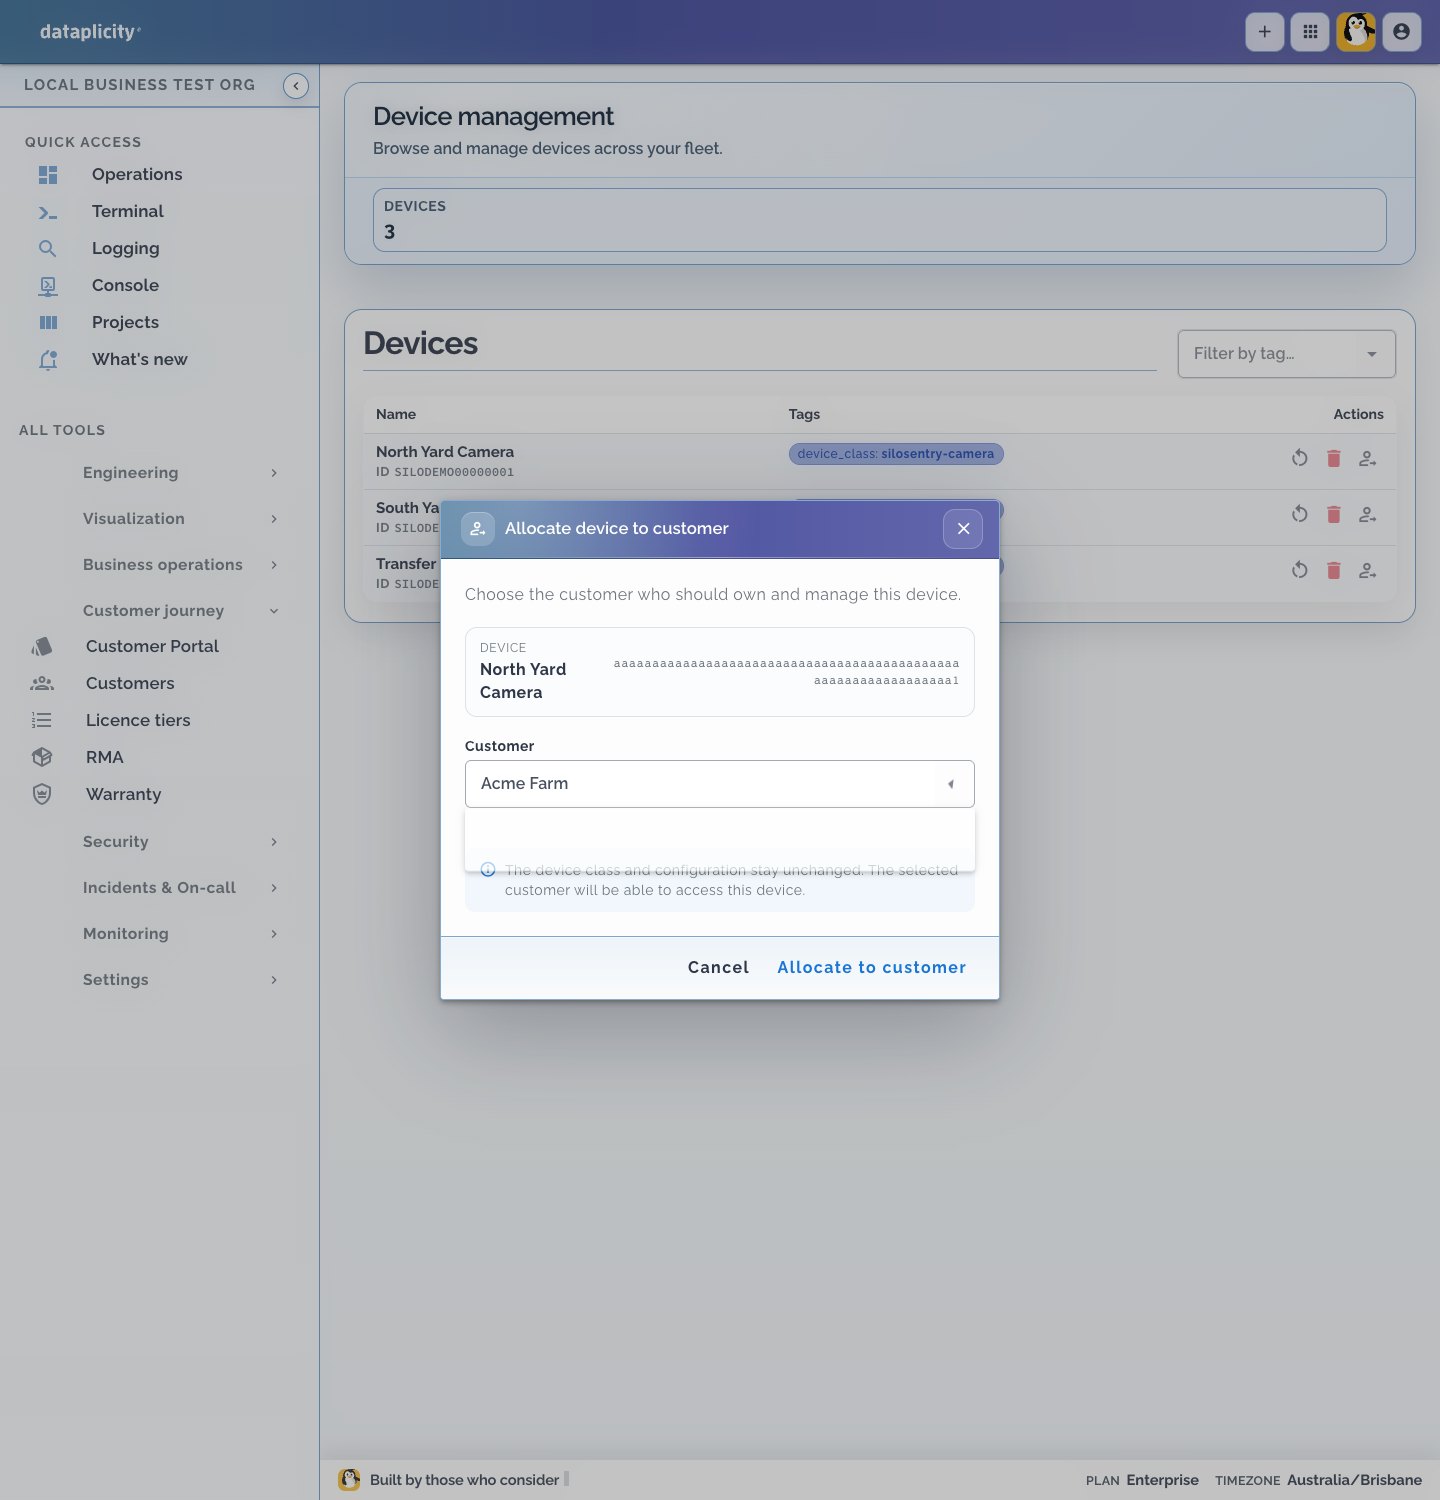
Allocation changes ownership only. It does not install the agent or camera Software. That is why live colour bars must already work in Step 4.
Done when: North Yard Camera is owned by Acme Farm.
Step 9. Place the camera and verify as the customer #
Still in the private customer browser session:
- Open Devices.
- Find North Yard Camera in the Ready state.
- Assign it to
Site Entrance. - Confirm it becomes Enabled.
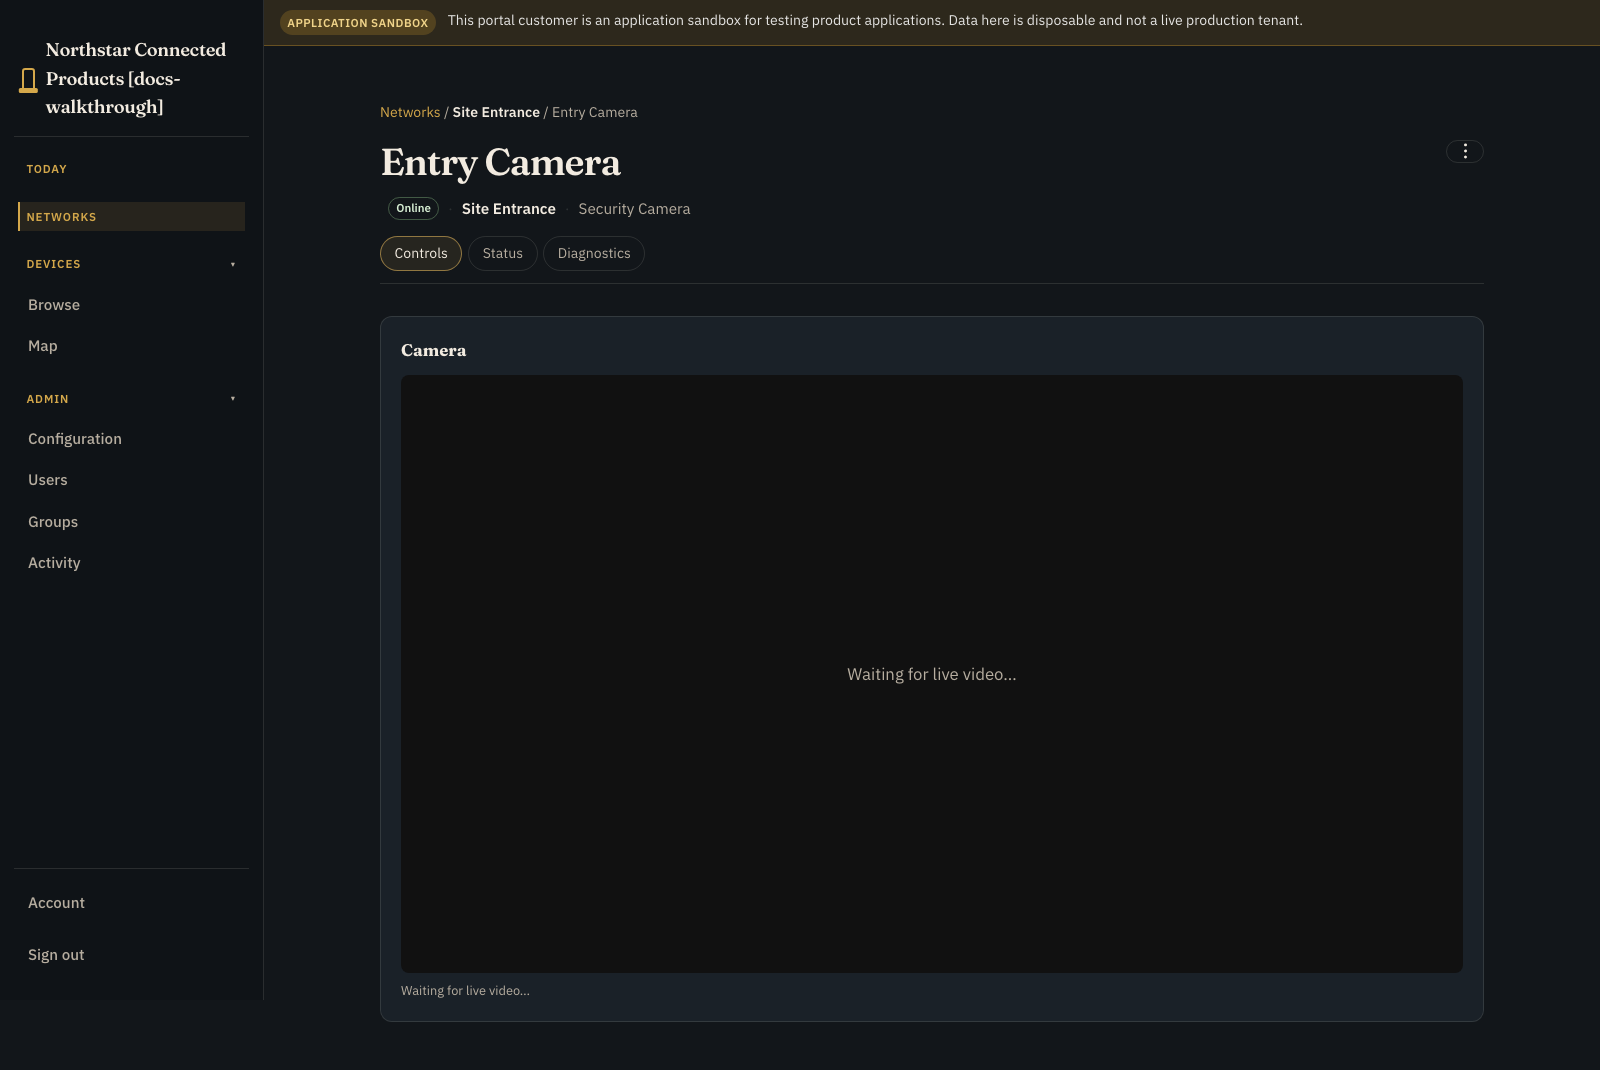
- Open Networks >
Site Entrance, then open North Yard Camera. - Stay on Controls for live view and recordings.
- Status is identity and connection context.
- Diagnostics is connection tests.
- Rename and removal are in the ⋮ menu.
- Select Live.
- Wait for live HLS. JPEG-over-WebSocket may appear briefly while HLS warms up.
- Leave live mode and scrub the timeline backward until at least one recorded chunk appears.
- Run Stop recording, confirm live view continues, then Start recording.

Useful portal URL shapes (replace the domain and ids with yours):
| Purpose | URL shape |
|---|---|
| Device list | https://your-vendor.dvcmgr.com/devices |
| One device | https://your-vendor.dvcmgr.com/devices/<device-hash> |
| Network-scoped device | https://your-vendor.dvcmgr.com/networks/<network-hash>/devices/<device-hash> |
Path A finish line #
You are done with the required workshop when all of these are true:
- [ ] Acme Farm Admin can sign in on your hosted portal domain
- [ ] North Yard Camera is Enabled on
Site Entrance - [ ] Live view shows colour bars
- [ ] The timeline has at least one recorded chunk you can scrub
- [ ] Stop recording / Start recording behave as expected
That is a sellable CCTV loop on Dataplicity. Everything below is optional.
Path B: Switch from test pattern to a real camera #
Do Path A first. Only then attach hardware.
B1. Wire and prove the camera locally (Raspberry Pi CSI) #
- Shut the Pi down completely:
bash
sudo poweroff- Wait for activity LEDs to stop, disconnect power, and earth yourself before touching the camera board.
- Use the correct ribbon:
- Pi 4 and earlier flagship boards: 15-pin connector on the Pi
- Pi 5 and Pi Zero: smaller 22-pin connector on the Pi (use a Standard-Mini cable)
- Official camera boards: 15-pin at the camera end
- Seat the ribbon:
- open the connector flap
- insert the ribbon straight and fully
- at the Pi, metallic contacts face away from the flap
- at the camera, metallic contacts face toward the camera board
- close the flap evenly; do not crease the ribbon
- Reconnect power, update, and reboot:
bash
sudo apt update
sudo apt full-upgrade -y
sudo reboot- After login:
bash
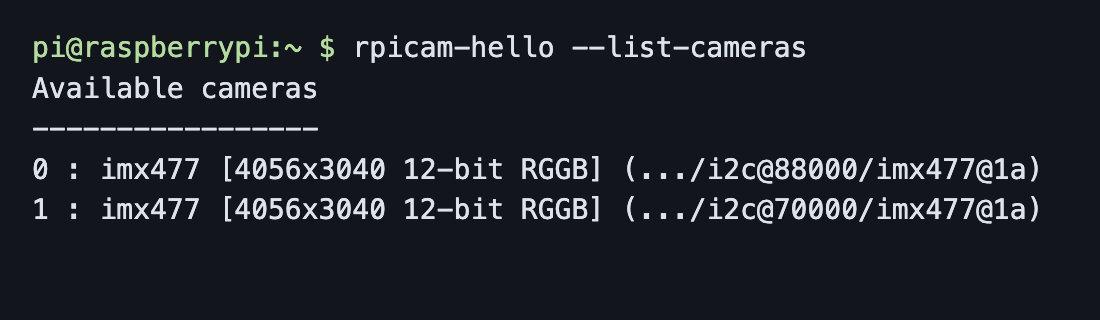
rpicam-hello --list-cameras
rpicam-still -n -o "$HOME/camera-test.jpg"
ls -lh "$HOME/camera-test.jpg"Done when: the list shows a sensor such as imx708, imx219, imx477, imx296, or imx500, and camera-test.jpg exists with a non-zero size.
Compute Module boards #
Normal Pi 4 / Pi 5 boards usually auto-detect official CSI cameras. Compute Module boards do not. If rpicam-hello --list-cameras reports no cameras while the ribbon looks correct, edit /boot/firmware/config.txt (or /boot/config.txt on older images):
text
camera_auto_detect=0
dtoverlay=imx477,cam0Match the overlay to the sensor, not the marketing name:
| Camera | Overlay |
|---|---|
| Camera Module 3 / Module 3 NoIR | imx708 |
| HQ Camera | imx477 |
| Camera Module 2 | imx219 |
| Global Shutter Camera | imx296 |
| AI Camera | imx500 |
Reboot and run rpicam-hello --list-cameras again. Wrong overlays fail with I2C probe errors even when the cable is fine.
USB camera instead of CSI #
bash
ls -l /dev/video*
ffmpeg -hide_banner -f v4l2 -list_formats all -i /dev/video0Note the correct /dev/video* path if it is not video0.
B2. Approve camera roles on the Device Class #
Real capture needs host camera mounts. Softwares request roles; they never ask for raw /dev/videoN paths themselves.
- Open SiloSentry Camera > Software.
- Open Video generator (sim).
- Find Camera roles (host privileges / approval section).
- Approve primary for a one-camera product.
- Approve secondary only if you will enable a second camera.
- Choose Approve and save.
Until roles are approved, devices will not receive camera mounts for that Software.
B3. Change Capture mode #
Still on Video generator Camera settings:
| Setting | CSI camera that passed B1 | USB camera that passed B1 |
|---|---|---|
| Capture mode | Raspberry Pi CSI camera (or Automatic detection after local proof) | USB / V4L2 camera |
| Primary camera device | usually unused for CSI | the /dev/video* path you noted |
| Primary camera index | 0 unless you selected another | 0 unless you selected another |
| Second camera | Off unless a second sensor is fitted and approved | Off unless a second sensor is fitted and approved |
Prefer an explicit CSI or USB mode after Path B1 succeeds, so a missing sensor fails visibly instead of silently falling back to colour bars.
B4. Re-check the device, then the customer #
- On North Yard Camera in the vendor workspace, confirm
video-gen-simis Running and live view shows the real scene, not colour bars. - Sign in as Acme Farm and confirm the same live image and timeline on Controls.
Privacy note: aim or mount so private areas are never captured. Browser rectangles are not privacy masks. The unmasked recording would still exist. Software privacy masks are not a product setting on this example Software.
Camera picker for later product design:
| Camera | Best use | Connection |
|---|---|---|
| Camera Module 3 | Default; autofocus; standard or wide | CSI ribbon |
| Camera Module 3 NoIR | Night with suitable IR illuminator | CSI ribbon |
| HQ Camera | Long range or chosen lens | CSI + lens |
| Global Shutter Camera | Fast machinery, gates, belts, vehicles | CSI + lens |
| Camera Module 2 | Low-cost fixed focus | CSI ribbon |
| USB UVC webcam | Fastest lab proof on V4L2 | USB |
Path C: Optional two-camera entrance inspection application #
Path A already gives live view and recordings on device Controls. Path C adds the shipped Camera access Product Application: a customer workplace that captures an entry snapshot, waits, then captures a lobby snapshot.
The starter in the UI is titled Two-camera entrance inspection. It is not required for basic CCTV.
C1. Prerequisites #
- Path A complete
- Prefer two camera devices of class SiloSentry Camera (you can bind the same class twice while testing)
- On the Device Class UI Components tab, confirm a trigger action the kit can map as Capture snapshot. If video-gen-sim only seeded recording actions, add a trigger action such as
capture_snapshot/ Capture snapshot that your device Software implements, or map the kit only after that action exists
C2. Create the application from the starter #
- Open Developer > Product Applications.
- Create an empty application (or open the overview starter cards).
- Choose Two-camera entrance inspection / Camera access and Use this example.
- In the kit dialog, map both required slots to SiloSentry Camera:
- Entry camera → SiloSentry Camera, snapshot action mapped
- Lobby camera → SiloSentry Camera, snapshot action mapped
- Apply the kit.
- Review Build > Hardware and Access > Customer portal.
- Publish version 1 under Release.
- Attach that version under Attached portals.


C3. Verify in the customer portal #
As Acme Farm Admin:
- Open the
Site Entrancenetwork workplace. - Confirm camera roles / checks appear for the site.
- Run the entrance capture operation once both cameras are Enabled on the network.
- Confirm a capture record is created for success or failure.
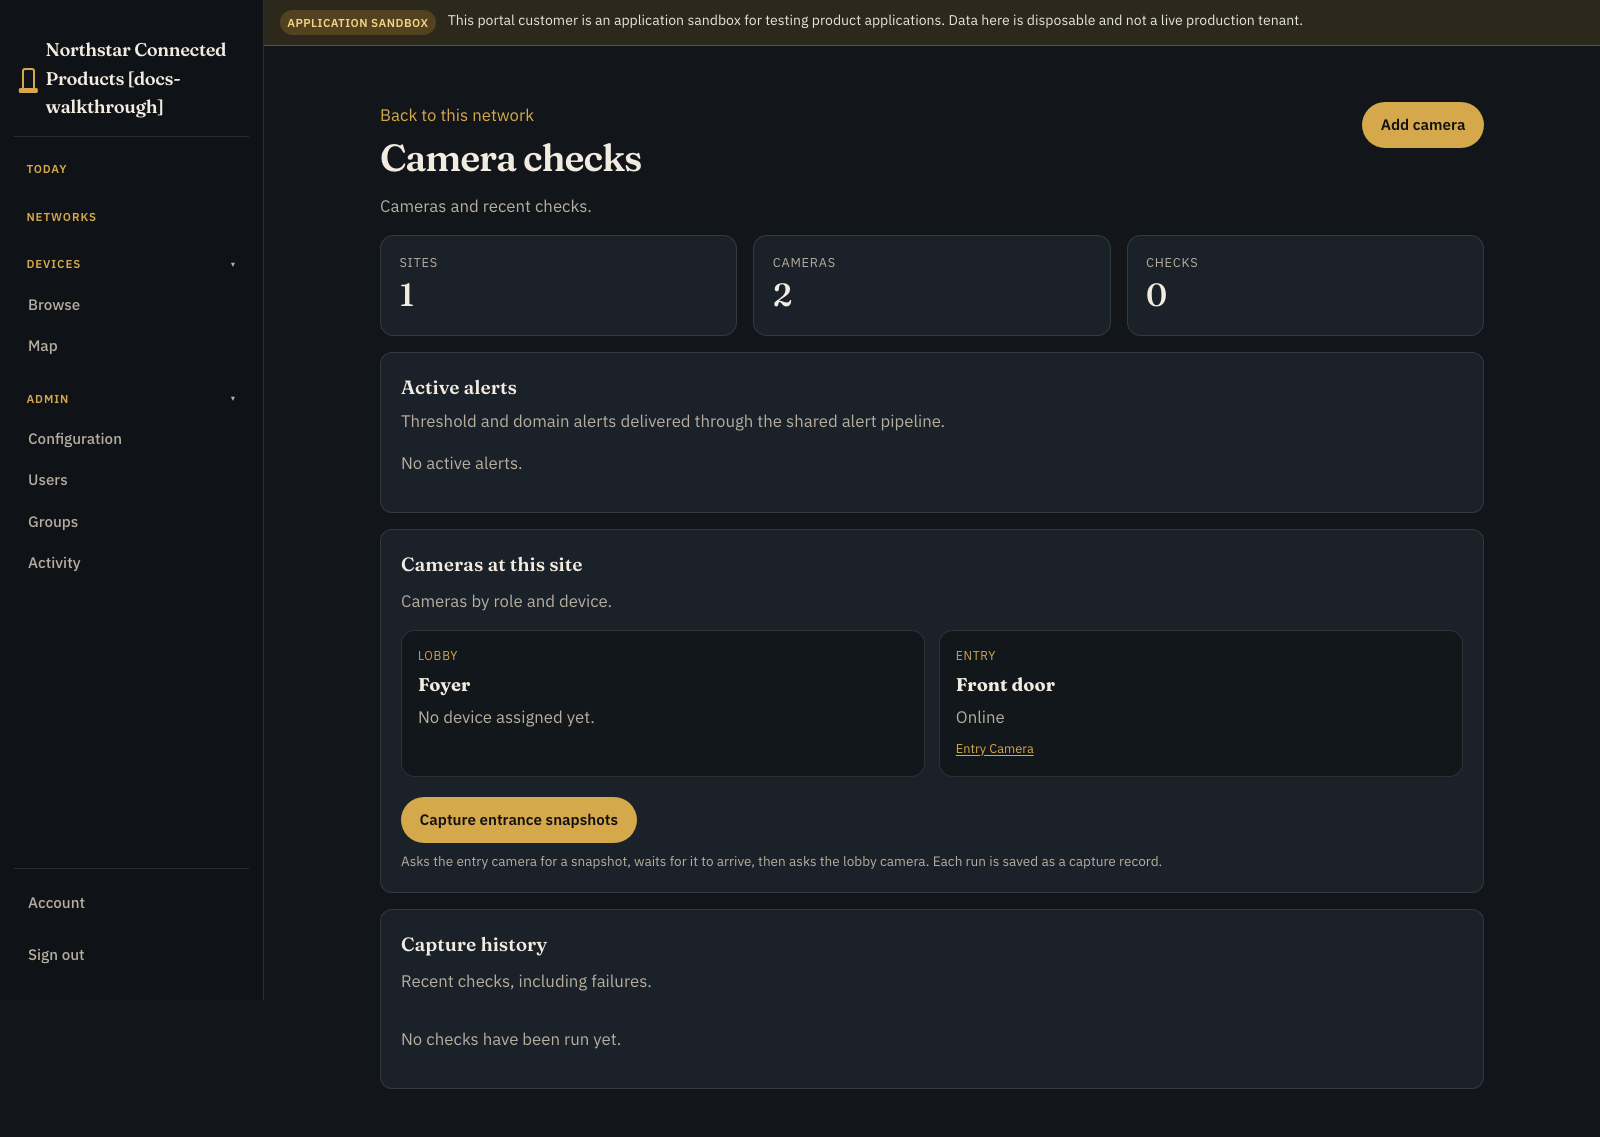
Live CCTV and recordings remain on each device's Controls tab. The Product Application adds the inspection workflow and site workplace on top.
Optional later: local plate sightings #
Turning live images into plate sighting records is a separate connected-product extension. It needs edge-video-analytics-sim, an explicit shared image mount, a Product Instance id, authored records/rules/processes, and privacy review.
Do not start that work until Paths A and B are solid. For the contract and limits of the example analytics runtime, see Example simulators. Keep the edge.vision.* event contract stable if you replace the prototype OCR algorithm later.
Handover checklist #
Hardware #
- [ ] Camera ribbon fully seated and strain-relieved (if fitted)
- [ ] Enclosure, focus, field of view, and night illumination correct
- [ ] Stable power and network
- [ ] Continuous recording uses durable media, not only the root SD card
Platform #
- [ ] Device Online
- [ ] Camera Software Running
- [ ] Expected image present (colour bars only when Capture mode is Test pattern)
- [ ] Live view and archive both work for the customer
- [ ] Camera has a customer-friendly name
- [ ] Device allocated to the intended customer and Enabled on the right network
Privacy and security #
- [ ] No inbound port or public camera web server exposed
- [ ] Provisioning command never shared
- [ ] Customer uses their own portal identity
- [ ] Private areas excluded by framing or mounting where required
- [ ] Retention, access, signage, consent, and local surveillance law reviewed
Troubleshooting without guessing #
"No cameras available" on the Pi #
- Power off before reseating the ribbon
- Verify 15-pin versus 22-pin cable
- Verify contact direction
- Update Raspberry Pi OS
- Re-run
rpicam-hello --list-cameras - On Compute Module boards, set
camera_auto_detect=0and the correctdtoverlay=for the sensor
Portal or OEM view shows colour bars #
- If Capture mode is Test pattern, colour bars are correct. Continue Path A.
- If you expected a real camera:
- prove the camera locally first (Path B1)
- approve Camera roles (Path B2)
- set Capture mode to CSI or USB, not Automatic detection with a missing sensor
- confirm the container runtime can access the approved camera mounts
Software is not running #
- Confirm Docker (or another supported runtime) works on the host
- Confirm the example has a published release for your architecture
- Confirm a current Software set includes
video-gen-sim - Open the device Software runtime panel for the reported error
Live works but history is empty #
- Wait for at least one short archive chunk to finish and upload
- Confirm recording is started
- Check free space and the resolved buffer directory
- Confirm the agent's video buffer is uploading
Customer cannot sign in #
- Use your tenant host (
*.dvcmgr.com), not the core Dataplicity login - Confirm the customer was created against your Customer Portal
- Resend password setup
- Do not reuse the vendor operator email
Product Application kit will not apply #
- Map both Entry camera and Lobby camera slots
- Map the required snapshot action on each slot
- Confirm Product Applications is available on your plan
- Publish a version, then attach it under Attached portals